 Courses usually use either points-based grading or weighted (or percentage-based) grading. There are advantages and disadvantages for both systems, but Canvas can easily accommodate either. By default, it is set up for points-based grading, so if you use weighted grading in your course, you will need to take a few additional steps.
How to Set Up Weighted Grading
1. Create Assignment Groups
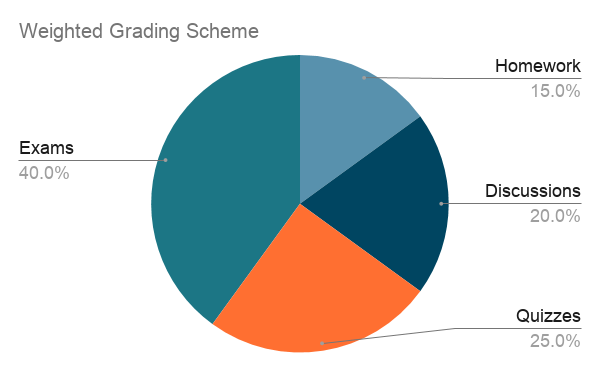
In Canvas, “assignment groups” refers to the broad categories of assignments to which you assign a percentage of the final grade. Go to the Assignments index page to create groups. The names of your assignment groups should align with your course syllabus.
2. Organize Assignments
Once you have created the groups, categorize your assignments appropriately. On the Assignments index page, drag and drop assignments to move them from one group to another or to reorganize them within a group. You can also change an assignment’s group by editing it and changing the assignment group in the options setting.
3. Assign Weights to Groups
In the Assignments index page, open the settings (three-dot menu) and select “Assignment Groups Weight.” Click the checkbox to open the box where you can enter the percentages for each assignment group. Be sure to double-check your total. Canvas will allow for a total that is more or less than 100%.
4. Special Configurations
a. Weighting Within an Assignment Group
If all assignments within a group have the same number of points, each assignment will carry equal weight within that group.
If there are any assignments within a group that should have more or less value than the others in that same group, you can change the point totals to reflect that. For example, if you want the draft of a paper to be half the value of the final version, you could set the draft to 50 points and the final to 100 points. Or even 65 and 130 points — the key is the proportion between the two.
b. Grading Rules
There are circumstances in which you need to drop grades within an assignment group. You can configure Canvas to factor this in automatically. For example, it can drop the lowest and highest test scores, but never drop the midterm or final.
5. Test Your Grading Configuration
If you haven’t already activated the Test Student account in your course, open the Student View on any page or assignment. Go to the Gradebook and assign grades for all assignments to the Test Student. Open the Test Student’s individual grades page to review the summary. Compare the calculations for the Test Student’s final grade with your own calculations. Make any adjustments as necessary.
Other Important Concerns
Two things can derail your grading setup and prevent students from seeing an accurate depiction of their final grade in Canvas: ungraded missing work and an incorrect grading scheme.
Ungraded Missing Work
Missing work receives a – (dash) grade in Canvas. It is a placeholder grade that is NOT factored into grade calculations. In order for missing work to affect grade calculations, you must enter a number (e.g., 0).
Best practice is to enter a true grade (e.g., a 0) as quickly as possible to ensure students don’t come to anticipate an overly inflated final grade. You can configure Canvas to automatically assign a grade for all work that is missing as of the due date. You can update that grade at any point. When the student submits the missing assignment, you will be notified as usual and the submission icon will appear in the grade book.
Course Grading Scheme
Unless you change it, Canvas will use the following grading scheme to assign letter grades:
| A 100% – 94% A- 94% – 90% B+ 90% – 87% B 87% – 84% B- 84% – 80% C+ 80% – 77% |
C 77% – 74% C- 74% – 70% D+ 70% – 67% D 67% – 64% D- 64% – 61% F 61% – 0% |
If your course has a different grading scheme, you will need to update Canvas to align with it.